Crane Lift Planning Checklist for Massachusetts Jobsites
03
Sep
A crane arrival is not the start of lift planning. By then, the crew should already know what is being moved, who is directing the work. Where the equipment will set up, and what conditions would stop the operation.
A safe crane lift starts with a site-specific review of the load, crane configuration, ground support, operator qualification, rigging, communication, and exclusion zone. Use this checklist as planning guidance, then confirm the final method against manufacturer instructions and review it with the responsible competent or qualified person.
Call 508-212-4735 for help choosing Massachusetts hoisting training.
Start by resolving the details that can create delays or unsafe changes before the crane is mobilized. Confirm the people, paperwork, equipment information, and site access first, so the lift-day conversation is based on verified conditions rather than assumptions.
What Should You Confirm Before the Crane Arrives?
Before equipment rolls onto the site, confirm what the job requires and who is accountable for each decision. Start with the lift scope: identify the load, pick and set locations, expected work area, access route, and any known restrictions. A basic planning record can capture the project name, location, contractor, and job number, giving the crew one shared reference before the crane lift begins.
Next, name the people who will review and execute the work. A practical pre-lift meeting includes the operator, signal person, rigger, and site supervisor. Each person should understand who directs the movement, how instructions will be communicated, and who has authority to pause the work. The meeting is an employer and site-planning duty. It does not replace the operator's licensing requirement or make an unqualified person eligible to operate the equipment.
Separate Massachusetts licensing from employer planning
In Massachusetts, the Office of Public Safety and Inspections licenses and regulates hoisting equipment operation under the state's hoisting program. The state licensing process addresses the operator's qualification, including knowledge of machinery, safe operating practices, hand signals, and inspection procedures. Massachusetts hoisting licenses must be renewed every two years. Review the current state guidance before relying on an application or renewal detail, because requirements can change: Massachusetts hoisting licensing and exams.
The employer or controlling site team still must plan the work. Verify the operator's current credential and expiration date, then confirm that the credential matches the equipment and work being assigned. If the equipment or assignment raises a classification question, consult the Massachusetts crane license classifications before scheduling the lift. A license check alone is not a site review, and a site review alone is not proof of the required state license.
Complete the site-specific review
Review the actual setup with the people responsible for the lift. Confirm the work area, travel and entry routes, swing clearance, and safe entry and exit. Check ground support, including possible settling or water accumulation around outriggers, and verify that the equipment is level after setup or movement. These checks should be tied to the site's hazard analysis and the manufacturer's instructions, not copied from a generic form.
Document the person responsible for the lift plan, along with signatures and dates when your site's process requires them. If conditions, personnel, equipment, or scope change, stop and re-brief the affected crew. The operator must have authority to stop when safety is uncertain. That clear separation between state licensing, employer coordination, and site-specific review helps prevent a paperwork check from being mistaken for a safe-to-lift decision.
How Do You Match the Crane and Rigging to the Load?
Start with the load, not the crane parked at the edge of the site. Confirm the load's identity, dimensions, gross weight, center of gravity, lifting points, and destination. Include anything that travels through the hook, such as the load block, line, spreader, below-the-hook device, and rigging. A weight estimate that leaves out those components can make the planned capacity look better than the actual lift.
Next, map the lift path and identify the greatest working radius. Radius changes as the load is picked, swung, and set, so use the most demanding point rather than the shortest distance. Record the operating area, pickup and set-down locations, maximum radius, and any restrictions that affect where the crane can sit. An Oklahoma State University crane checklist is a useful example of the kind of planning record that captures load dimensions, gross weight, work area, and maximum radius. It is a planning example, not a universal Massachusetts legal form.
Check configuration before comparing capacity
Use the crane manufacturer's current load chart for the specific machine and planned setup. Confirm the boom length, boom angle, jib length or size, jib type, jib offset angle, counterweight arrangement, outrigger position, and any applicable operating mode. The rated capacity can change significantly when the radius or configuration changes. Manufacturer instructions and the site's lift calculations control the decision, not a generic capacity number found online or printed on a different crane.
Then compare the total calculated load with the chart capacity at the limiting radius and configuration. Account for load weight, line weight, load-block weight, crane components, and the capacity of the rigging assembly. The rigging must be selected for the expected loading and hitch arrangement, with slings, shackles. Hooks, lifting beams, and other devices inspected and used according to their markings and instructions. A qualified rigger should inspect rigging before the shift where the applicable OSHA requirements call for that review. See the crane rigging and signal training options for preparation in rigging, signals, and hazard avoidance.
Quick matching checklist
- Verify the load's dimensions, gross weight, center of gravity, lifting points, and destination.
- Calculate the maximum radius along the full lift path, including pickup and set-down.
- Match boom, jib, angles, counterweights, outriggers, and ground setup to the manufacturer's load chart.
- Include line, block, crane-component, below-the-hook, and rigging weights in the calculation.
- Confirm rigging capacity, hitch configuration, inspection status, and tagline needs before the pre-lift meeting.
| Planning item | Confirm before the lift |
|---|
| Load | Dimensions, gross weight, lifting points, center of gravity, and destination. |
| Crane setup | Radius, boom and jib configuration, counterweights, outriggers, level, and chart capacity. |
| Rigging | Device capacity, hitch arrangement, inspection status, and tagline needs. |
| Site | Ground support, swing clearance, overhead hazards, access, and exclusion zone. |
Sequence the review
- Define the load and complete the capacity calculation.
- Confirm the crane setup and ground support.
- Assign roles, test communications, and establish the exclusion zone.
- Inspect the equipment and rigging before the first pick.
- Brief the crew again whenever conditions or the plan changes.
Taglines can help control rotation or keep workers from placing hands near a suspended load, but they do not replace clearance, communication, or a qualified site review. If load information, radius, configuration, capacity, or rigging selection is uncertain, pause the crane lift and resolve the uncertainty before handling the load.
What Site Conditions Can Change a Crane Lift?
A lift plan can be accurate on paper and still become unsafe when the jobsite changes. Before raising the load, inspect the actual setup area, access route, swing path, and weather conditions. Repeat that check after a move, a setup change, heavy rain, or any event that could affect stability.
Confirm ground support and equipment level
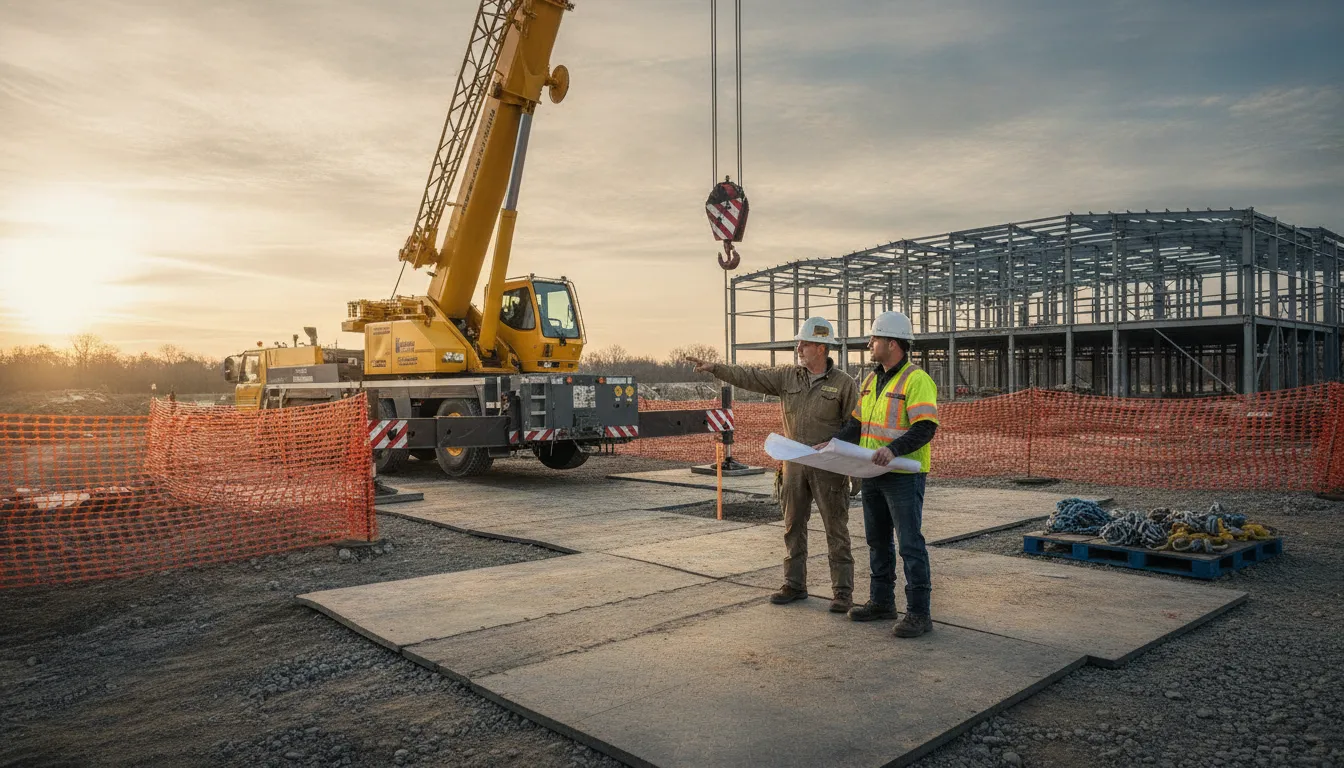
Ground support is more than whether the surface looks paved or compact. Check for soft areas, voids, recent excavation, settlement, slopes, and water accumulation around the crane and outriggers. OSHA inspection guidance specifically calls for checking proper support, including settling under and around outriggers and ground water accumulation. It also calls for verifying that hoisting equipment is level, including after each move and setup. See the OSHA hoisting and rigging requirements.
Use the crane manufacturer's setup instructions and the site-specific lift plan to determine suitable outrigger support, mats, cribbing, and positioning. These are planning and engineering decisions, not details to improvise at the controls. If an outrigger shifts, the crane settles, the bubble moves out of level, or water undermines the area, pause the lift. Have the competent or qualified person reassess the setup before work resumes.
Walk the clearance and access areas
Trace the load from pickup to placement, including the highest point of the boom and the full swing radius. Look for power lines, buildings, scaffolds, trees, stored materials, open excavations, traffic, and people who could enter the work zone. A field checklist can verify both swing clearance and safe entry and exit, along with completion of job hazard analyses. Document those checks rather than relying on a quick verbal assumption.
Access can change during the day. A delivery truck, trench, barricade, or newly staged material may limit the crane's travel path or block an emergency exit. Keep an exclusion area around the lift and make sure the crew knows where they may stand. For practical preparation, crane rigging and signal training can help workers recognize changing setup and clearance hazards.
Monitor weather and use stop-work authority
Wind, lightning, heavy rain, ice, poor visibility, and rapidly changing conditions can affect load control, ground stability, and communication. Follow the crane manufacturer's limits, the lift plan, and the responsible site's weather procedure. If conditions no longer match the plan, stop and re-brief the crew instead of pressing ahead to meet a schedule.
The cited OSHA guidance states that when a deficiency is found, a competent person must determine whether it is a hazard. Equipment with a hazardous deficiency must be removed from service until corrected. It also gives the operator authority to stop and refuse to handle loads whenever safety is uncertain. That authority is a requirement under the cited rule; conservative weather holds, added monitoring, and a fresh site walk are prudent planning practices that support the same decision.
How Will the Crew Communicate During the Lift?
Hold a pre-lift meeting before the crane moves, not after the load is suspended. Bring together the signal person, rigger, operator, and site supervisor so everyone understands the lift sequence, hazards, and authority for changing or stopping the work. A checklist from Oklahoma State University uses these roles as a practical planning group. But it is guidance for organizing the job, not a statement that every item is a Massachusetts legal requirement. Review the site-specific lift plan and the crane manufacturer's instructions before the meeting.
Assign responsibilities in plain language. The rigger prepares and checks the connection. The signal person directs the operator when that person is designated to do so. The operator controls the crane and confirms that signals are understood. The supervisor coordinates the overall work and keeps other crews outside the hazard area. If more than one person can give instructions, stop and resolve that conflict before lifting. One clear chain of command prevents competing signals when the load is moving.
Choose and test the communication method
Decide whether the crew will use hand signals, radios, both, or another method. The lift checklist specifically records that choice. Hand signals can work when the signal person remains visible and the operator has an unobstructed view. Radios may be necessary around buildings, equipment, or blind spots. Test the channel, volume, and backup method before the first pick. Use concise, agreed wording. Repeat critical instructions when practical, and require the operator to ask for clarification rather than guess.
Everyone should know the stop-work command and treat it as immediate. The operator has authority to stop and refuse to handle the load whenever there is doubt about safety until safety is assured. As OSHA states in its steel-erection hoisting requirements: OSHA 1926.753. A worker who sees a person enter the swing area, loses sight of the load, notices shifting rigging, or loses radio contact should say "Stop" clearly. The operator should stop, stabilize the situation when safe, and wait for the supervisor to re-brief the crew.
Control the load without placing people in the line of fire
Plan taglines when they will help control rotation or positioning. Record whether taglines will be used, along with their diameter and length, in the lift documentation. Do not wrap a tagline around a hand or body, and do not pull a suspended load from a dangerous position. Keep workers out of the load's path and swing radius. If the planned route, communication method, or crew roles change, lower the load when safe and conduct a new briefing. For focused crane rigging and signal training, use instruction that matches the equipment and work your crew performs.
What Belongs in the Lift-Day Checklist?
A lift-day checklist turns the approved plan into a final field check. It should be completed with the competent person, operator, rigger, signal person, and site supervisor before the crane lift begins. Use it to confirm that the equipment, load, work area, and crew are still aligned with the plan. Not to replace the site-specific lift plan, manufacturer instructions, or applicable OSHA and Massachusetts requirements.
Inspect the crane, rigging, and setup
For steel erection work, OSHA describes a competent-person visual inspection before each shift, including observation for deficiencies during operation. The inspection should cover the following items:
- Controls and drive mechanisms for maladjustment, excessive wear, contamination, water, or lubricants.
- Boom angle indicators, boom stops, anti-two-block devices, load moment indicators where required, and other safety devices.
- Air, hydraulic, and other pressurized lines for deterioration or leakage, especially at points that flex during normal operation.
- Hooks and latches for deformation, cracks, chemical damage, or wear.
- Wire-rope reeving against the equipment manufacturer's specifications, plus electrical apparatus for damage, dirt, moisture, or malfunction.
- Hydraulic fluid level, tire inflation and condition, outrigger support, ground settling, water accumulation, and level position. Recheck level after every move or setup.
A qualified rigger should inspect rigging before the shift under the cited OSHA requirements. If a deficiency may be hazardous, the competent person must determine whether it creates a hazard. Equipment with a hazardous deficiency stays out of service until corrected. The operator also has authority to stop and refuse a load whenever safety is uncertain. See the OSHA hoisting and rigging requirements for the applicable rule text.
Confirm the work area and paperwork
- Verify the load description, dimensions, gross weight, lift points, travel path, operating area, maximum radius, boom and jib configuration, line and load-block weights, lifting capacity, and rigging capacity.
- Complete the job hazard analysis. Check ground stability, swing clearance, overhead hazards, exclusion zones, and safe entry and exit.
- Establish who can direct the lift, confirm hand or radio communication, and document whether taglines will be used.
- Hold the pre-lift meeting with the operator, rigger, signal person, and supervisor. Record the responsible planner, signatures, dates, operator certification card, and expiration date.
If the load, weather, ground, equipment position, personnel, route, or communication method changes, pause and reassess. Update the plan as needed, then re-brief everyone before resuming. A checklist is a control against overlooked details, not permission to bypass a required review.
What Should Massachusetts Employers Document After the Lift?
Close the job by preserving the records that show what was planned, who participated, and whether conditions changed. A practical record supports the next shift, helps supervisors identify recurring hazards, and gives the employer a clear basis for reviewing the work. It does not turn a general checklist into a site-specific lift plan, and it does not replace the responsible competent or qualified person's judgment.
Keep the completed checklist with the lift plan or project safety file. Record the project and location, date, contractor, job or work-order number, lift description, dimensions. Gross load weight, operating area, maximum radius, crane configuration, and the person responsible for the plan. A planning checklist from Oklahoma State University uses these fields as a useful model for organizing lift information, but employers should follow their own procedures and applicable requirements.
Keep qualification and inspection records together
Document the operator's Massachusetts license information when the work requires it, along with any employer-required qualification or certification records. Massachusetts says the Office of Public Safety and Inspections licenses and regulates hoisting equipment operation. Its hoisting engineer exam covers machinery, safe operating practices, hand signals, and inspection procedures. Licenses must be renewed every two years. Confirm current requirements with the state before relying on a checklist.
Also record the pre-shift inspection, identified deficiencies, corrective action, and the name or role of the person who made the determination. If a deficiency is a hazard, the equipment must remain out of service until corrected under the cited OSHA provision. Record the pre-lift meeting, communication method, signal person, rigger, operator, supervisor, exclusion-zone setup, and any changes that triggered a re-brief.
Business Owner Note: A consistent file makes it easier to verify crew readiness across jobsites and identify when your team needs additional crane operator. Inspector, rigging, or signal training.
When training is the next step
If a team member needs help choosing a Massachusetts hoisting classification or preparing for testing, review the Massachusetts crane license classifications and the Massachusetts hoisting test application resources. Employers seeking role-specific instruction can also review crane operator and inspector training.
This article is general safety education. It is not legal advice and is not a substitute for a site-specific lift plan. A competent-person or qualified-person review, the crane manufacturer's instructions, or current OSHA and Massachusetts requirements.
Frequently Asked Questions About Crane Lifts
What is the first step in planning a crane lift?
Start by defining the load, destination, operating area, maximum radius, crane configuration, and responsible planner. Then confirm the operator, rigger, signal person, and supervisor roles. Review the site for ground support, overhead hazards, access, swing clearance, and an exclusion zone before equipment arrives. Use the manufacturer's instructions and a site-specific lift plan as the controlling documents.
How do you check whether a crane can handle a load?
Use the actual gross load, radius, boom and jib configuration, line and block weights, rigging capacity, and the manufacturer's current load chart. Do not estimate capacity from the crane's nameplate or a general online table. A qualified person should review the calculations and stop the lift if the configuration, conditions, or load information is uncertain.
Who should attend a pre-lift meeting?
The operator, signal person, rigger, and site supervisor should review the lift sequence, communication method, travel path, exclusion zone, hazards, emergency response, and stop-work process. Include other workers whose tasks could enter the area. Everyone should know who gives signals and how to stop the operation when conditions change.
What should be documented after a crane lift?
Keep the completed inspection and lift records, load and configuration data, operator qualification information. Pre-lift meeting details, communication method, ground and access review, exclusion-zone controls, deficiencies, corrections, signatures, and any re-brief. The record should identify the project, location, date, and person responsible. Retain records according to your safety program and applicable rules.
Need Help Preparing Your Massachusetts Hoisting Team?
A field-ready crane lift checklist works best when the people using it understand the equipment, signals, inspections, and Massachusetts licensing context behind each step. MA Hoisting License offers practical preparation for operators and employers choosing an appropriate training path. Course availability and requirements can change, so contact the team for current guidance.
Call 508-212-4735 to discuss Massachusetts hoisting training.
Before the next lift, confirm the site-specific plan, responsible review, equipment instructions, crew communication, and documentation process. When any part of the operation is uncertain, pause and resolve it before handling the load.
Tags: ,